
The decoupage technique came to us from Ancient China, although the name itself was given to it by the French much later. An interesting, simple, budgetary and always effective way to decorate any product did not pass by DIY decor lovers. Today we will tell you about decoupage bottles and offer 10 interesting ideas!
1. Direct decoupage
This is the simplest technique and is essentially the same as applique. Therefore, even a small child can easily master it, if he already knows how to cut and glue. You just need to carefully cut or tear off the pictures on a napkin or paper and gradually glue the prepared surface with them.
Before starting work, the bottle can be painted with acrylic paints or covered with a special primer. Stick the drawings so that there are no bubbles or wrinkles anywhere. Be sure to cover the product with varnish on top so that it will last longer.


2. Decoupage bottle with a cloth
Flaps and fabric inserts create additional volume and texture. They can emphasize individual elements of the picture - for example, drape a skirt or an umbrella of a romantic French lady, or form convex flower petals. Thanks to the panel effect, the image looks more vivid and realistic.
Before gluing, be sure to intensively saturate the PVA fabric. Do not wait until it dries, and immediately apply to the bottle, create bruises and volume. After drying, you can add acrylic, glitter, foil or patina, and at the end - secure with varnish.

3. Smoky decoupage bottles
Unusual artistic technique is suitable for those who want to add elements of painting to decoupage, but do not know how to draw at all. Thus, you can add color, gradients, make chiaroscuro or shade, add volume to the composition. Due to this, smooth transitions from one part of the work to another, or even the effect of a fresco, are obtained.
With simple acrylic paints, you can paint small details, add brightness or smooth sloppy transitions. For shading, chopped pastels of the same shade as the drawing are suitable. With a semi-transparent haze, it is easier to blend in elements with crisp edges. Only with pastels it is better to use a matte varnish, because it will not lie on a glossy surface.


Decoupage for beginners step by step: 8 video lessons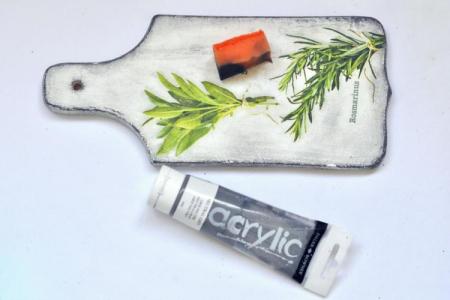
4. Decoupage bottle through a file
The decoupage technique through a file is a good way for large pictures or thin paper that can get wet and rip. Carefully peel off the top layer of the napkin and apply it to the file in a pattern. Spray water from a spray bottle to completely saturate the drawing, and gently spread by hand.
Place another file on top, and then go over the "sandwich" with a soft elastic sponge or sponge. It is necessary to smooth out the drawing well and drive out the remaining water from under it. Then remove the upper file, and gently attach the lower one with the pattern to the bottle and smooth it again. At the end, all that remains is to remove the top film, fix the result with glue and varnish.


5. Decoupage bottle with putty
The putty can be used as a base coat instead of paint or applied to individual elements. It is most convenient to work with a thin artistic spatula or wooden sticks. Do not apply the putty in a too thick layer at once - 2-3 mm is enough. You can form an imitation of brick or wood on the bottle, experiment with fine-grained textured plaster, or glue patterns and decor over it.


6. Decoupage the bottle with rice paper
Loose, textured and translucent rice paper gives the decoupage technique a special chic. Most often it is used for baking or spring rolls - that is, in cooking. This means that it is completely safe, environmentally friendly and even useful.
You will need a pre-fat-free bottle, rice paper itself, and some interesting pattern.It is better not to cut the paper, but to tear it by hand in shreds - its uneven edges look much more beautiful. You can use PVA for gluing, or you can simply moisten the sheet, press it firmly against the glass and dry it with a hairdryer.

DIY crafts from all sorts of things: 15 ideas
7. Bottle using deco patch technique
This decoupage technique resembles patchwork - sewing things from small, different-textured patches. Therefore, you will need multi-colored scraps and scraps of paper of any density. Napkins, pages of old gloss, newspapers or special paper are suitable here. Bottles decorated with music sheets look very interesting.
Choose one characteristic that will unite your patchwork bottle - for example, style, theme, color or texture. They don't have to be identical: use the color wheel principle or contrasts. The main thing is that there is a concept, and a brand new bottle will not look clumsy. Decopatch is good both as a background and as a full-fledged independent decor.

8. Decoupage of a bottle with volumetric maps
In stores for creativity, so-called volumetric maps are sold. Your bottle with them will be embossed and even sculptural - which means you can create much more unusual solutions. By the way, you can make such maps yourself if you print a picture on 6-7 sheets and layering separate volumetric fragments.


9. Decoupage bottle with modeling paste
Volumetric decoupage of a bottle is a relatively young technique, but it quickly gained popularity due to its realistic effect. You can make both whole patterns and individual details of the picture volumetric. The modeling paste is soft and sticks well, so it will make bird feathers, flower petals or the crown of the tree in the picture.
In order for the volumetric fragment to adhere well to the bottle, it must be glued, carefully leveled and pressed against the edges with a brush or finger. So that nothing sticks - wet them. It is advisable that the edges of the paste part do not reach the contour of the element that you are filling, at least by a millimeter. On top you can stick other drawings, paint, decorate with anything.

Crafts from plastic bottles: 90 photo ideas
10. Decoupage bottle with art gels
Art gels differ from modeling paste in texture and purpose. Their task is to create the effect of oil painting, therefore they are applied to the bottle with a brush with light wide strokes. After drying, the gel becomes transparent, and only an expressive texture remains.
