
A paper crane is a symbol of happiness, luck, faith and the struggle for the future. Every Japanese can fold it from memory, and the story of the girl Sadako from Hiroshima and her thousands of paper tsuru is known all over the world. Now let's figure out how to make the coveted origami figurine with our own hands. And at the same time we will tell you what other schemes and variations there are!
1. Origami crane
The classic paper crane is not the easiest origami, but it always looks good. Small colored handicrafts are used to make decorations, interior decor and gifts. Therefore, we will begin our experiments with him.
Fold the paper square twice into a right-angled triangle-"book". Remember this technique - it is used in many origami shapes. Expand the top layer on both sides into a rhombus, and mark along the top quadrangle.
These folds are needed to lay out the entire top layer in a pattern on both sides so that all edges and edges match perfectly. The finished shape is the standard blank for most origami birds. Fold the lower parts of the elongated rhombus up, make the head, and smooth the tail well so that it is flat and even. Finally, spread the wings of the crane at an angle from the head to the base.

2. Volumetric crane for children
If you need a crane for a child, and the classic scheme is too complicated, then you can make the option simpler. To do this, transfer the blank to the white square - draw the neck, head and beak and paint over the corners with black. Indeed, in real life, the crane is not pure white, but with dark ends of the plumage.
Cut through the head and neck, and notch at the opposite top of the torso square. Cut the black corners with paper fringes and gently twist them with scissors or a pencil. Fold the figure in half, secure with the body notches and hang the crane on a string.

3. Crane on a stand
A rectangular sheet of paper will make an amazing large crane on a stand. From the top square of the rectangle, fold the volumetric triangle with the sides tucked inward. Turn the lower part back, like a substrate - we will return to it a little later.
Expand the right side of the upper triangle into a rhombus, shift its lower part up, bend it back and turn it to the side - exactly according to the diagram. Repeat the above steps once more and turn the workpiece over with the rectangular substrate facing up. Fold it in half, and then - from the bottom up with a regular ladder. The main thing is to clamp all the lines well so that the crane is even and neat.
Flip the parts again and tuck the corners of the main triangle. Form the neck and head, and fix the bottom with thin paper tape. For the first time, collect complex origami from a whole thin sheet or special paper, and when you fill your hand, start experimenting with sizes, colors and textures.

8 best diagrams on how to make a paper box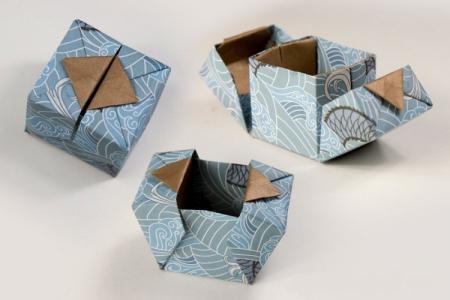
4. Crane with voluminous wings
Such a crane differs from the classic one with its voluminous fan wings - everything is to your taste. They can be beautifully painted with feathers using gel pens or initially painted on paper with delicate watercolor stains. First, proceed according to the standard scheme: fold a square sheet into a volumetric triangle, and unfold it into a rhombus.
Form a standard origami bird and turn over its parts: top right to the left, and bottom left to the right. The lower part will be your fan wings, so you can fold it like an accordion. Shape the neck and head of the crane, extend the tail slightly and gently spread the figurine so that it stands firmly on the table.

5. Cut out painting "Crane"
To get a little distraction from origami, take a closer look at the cut paintings. This is a very stylish and graceful technique for pleasant holiday cards and home decor.Take a thick sheet of white paper, felt-tip pens or pens, and a sharp new utility knife.
On the back of the sheet, mark out the outlines of the wings with a thin pencil and draw the plumage. Cut out each feather with a knife and gently bend it outward, creating a slight curl. Draw the head and legs of the crane with thin felt-tip pens - the picture is ready!

How to make a paper heart: 6 simple diagrams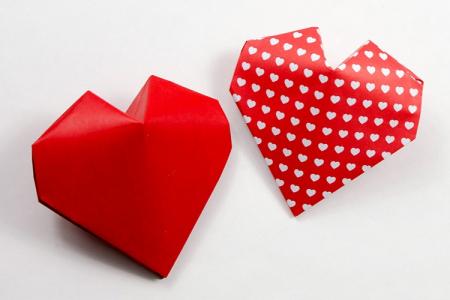
6. Flying crane
Unfold the square of paper with its top down and mark the diagonals in the usual pattern. Fold the left vertex to the center and mark a point, and lay the right vertex to the fold line. Turn the shape over with the base of the pentagon facing up and fold it in an accordion to expose the triangle. Fold the figure in half - and you will already see the first outlines of the future origami bird.
Then tuck the left side with the triangle and unfold the corner into an equilateral rhombus. Point the top down and flip the piece again to form the wings. Lift the fragments of the upper layer up at a right angle and spread them out in a trapezoid. And then spread it out on both diagonals - so the wings will turn out to be much wider and more textured.
Flip the diamond upward and fold the sides to the middle. Raise the left side of the base up and form a head on a long neck. Bring the right side down, bend it, flatten it well and lift it up at an angle to make a tail. Form small fans at the tips of the wings for even more volume and spread them to the sides.

7. Crane-applique
Another spectacular flying paper crane can be made in the form of an applique. To do this, you will need colored cardboard for the background and thick white paper for the bird itself. First, draw the body, beak, paws and glue them to the substrate - on PVA or volumetric double-sided tape.
There are two ways with wings - fold them from 4-5 layers or lay out each feather one by one. In any case, glue them not over the entire plane, but pointwise along the edges. So the wings will turn out to be really light and voluminous, and the crane will fly.

Paper goby: craft ideas for the New Year 2021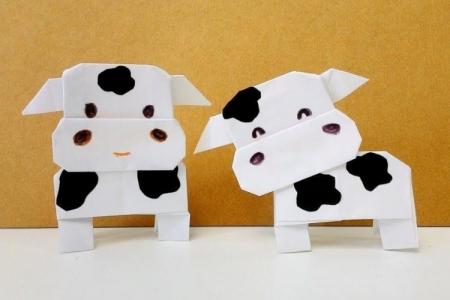
8. Crane with a fan-tail
A crane with a lush fan-tail is made a little differently - more like a flower. Lay out the already familiar marked square of paper like a stand on legs. Reassemble it along the existing lines into a volumetric pentagon with a base at the fold. Then follow the beaten path and expand the top layer into a standard elongated quadrangle.
Now is the time to disassemble the blank, reassemble it according to the scheme, turn over and turn over the "pages" on both sides. Fold up both sides according to the pattern so that you get a symmetrical part in the middle. Roll up the rest of the trapezoid and lower the top. Mark the neck with the head, and all that remains is to spread the tail and wings with your hands, and put the crane on the table!


