
Are you looking for unusual interior decorations? Pay attention to the interesting "trees of happiness" that came to us from Ancient Egypt. Topiary does not have to be expensive, but you can even make it yourself. We will tell you exactly how and what materials will be useful to you for this!
We make a blank for topiary
In order not to repeat ourselves every time, let's first figure out how to make a standard blank for topiary. The barrel will be made from a stick, a twig, a piece of plastic tubing, a base from a pen, pencil, or any similar material. Even dense thick wire twisted in several layers will do.
A blank for a crown can be made from crumpled newspaper or paper, foam, foil wrapped with threads, or from a plastic ball of a suitable size. The main thing is that it can be glued to the barrel or inserted inside and fixed.
Earth, sand, small pebbles, pebbles, shells, smooth glass, beads are suitable as a filler for the pot - to your taste. To make the trunk heavier and firmly attached, first you can pour cement, putty or any other construction mixture inside.


1. Topiary from coffee beans
Fragrant and flavorful whole coffee beans are often used to make jewelry. It is better to take your favorite quality brand and do not save - the smell will last longer. You will also need brown acrylic paint, a glue gun for fixing, and decor.
It is more convenient to glue the grains on a perfectly flat base, so a smooth ball is better suited here. Cover it with scraps of newspaper like papier-mâché and paint it brown to match the color of the grains. Keep in mind that each grain will have to be glued by hand, gradually adjusting them to each other - so take time and patience.
")
")
2. Topiary from satin ribbons
You will need 6-7 meters of colored ribbons from 5 cm wide, a glue gun, beads, buttons and ribbons for decoration. Fold 12-16 colored roses as shown in the photos and decorate them with ribbons or beads. Just sew them on with a thin needle or glue them gently with a pistol.
If you have a minimalistic interior, one color looks just as good, but think about small contrasting details. For example, red core droplets will liven up an elegant beige topiary. Take the finished base and glue the ball-crown with roses so that they completely and tightly cover it. You can wrap the rest of the tape around the trunk or decorate the pot.


Topiary from coffee beans: 8 beautiful ideas step by step (photo)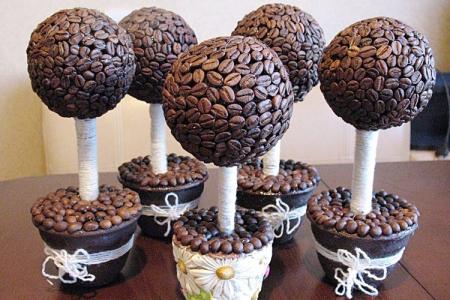
3. Topiary of sweets
Presenting a box of chocolates has long been too boring and trite. Nowadays they collect luxurious bouquets and fancy decorative compositions from sweets. In the same way, you can make a beautiful topirium yourself and decorate it with paper flowers, ribbons, beads or folded prediction wishes.
Round candies in separate pieces of paper each are best suited - they are more convenient to glue and carry with you. Although you can even take gummies or soft marshmallows and carefully sew them together with a disinfected needle and thread. Such a craft will decorate the festive table and delight the youngest guests of the event!

4. Topiary from autumn leaves and dried flowers
From dried bright leaves and flowers, you can make a very fragile, but very beautiful autumn topiary. Use glue for fastening, but try not to overdo it so that the blades of grass and leaves seem light and airy. The composition can be composed right in the process, the main thing is to work extremely carefully and delicately.


5. Topiary from napkins
If you still have bright beautiful napkins from a festive feast, using ordinary scissors and a stapler, you can also turn them into a beautiful elegant topiary.Paste a blank ball over one of the napkins, decorate with ribbons and leave to dry while you do flowers.
Fold the remaining napkins several times, connect with a stapler and cut out circles from them. All petals are formed by hand - in fact, you need to gently crush and straighten them. The number of flowers depends on their size - on average about 15. Then all you have to do is stick them on the base and decorate with beads, lace, bows.

Crafts from coffee beans with your own hands: 10 beautiful ideas (photo)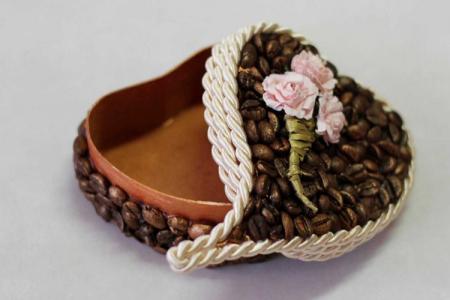
6. Topiary from wrapping paper
Thick and variegated wrapping paper will make beautiful flowers for decorating topiary. Ideally, the paper should be double-sided - and then just follow the pattern. Cut into circles about 7 cm in diameter and fold them into petals. A stapler with small staples or the same glue gun is suitable for connection.
From thick corrugated paper, beautiful elastic roses are obtained, which tightly cover the ball-crown. Cut the paper into long strips about 5 cm wide, slightly bend one edge for volume and roll up small rose rolls. You will need a lot of such flowers - several dozen, depending on the size of the ball.


7. Topiary made of artificial flowers
Old, unnecessary fake flowers from clothing, home decor, or other crafts are perfect for topiary. And if there are many of them, you can make several similar trees at once for symbolic gifts or decorate a large room. For fastening, use the original wire stems, which you can simply stick tightly into the foam base.


8. Topiary from seashells
It is difficult to think of something more effective for the Mediterranean style than shell topiary. Finally, all the supplies brought from the sea will be used together with pebbles, small pieces of glass, pearls, threads and ribbons. The main thing here is to firmly and carefully glue the shells around the entire perimeter so that they do not fall off the base.

9. Topiary from cones
Lovers of sustainable trends and Scandinavian interiors will certainly appreciate the cone topiary. Moreover, apart from them, you practically do not need anything. Select cones of about the same size so that they tightly cover the ball, and paste over the painted base with them. It remains to decorate the craft with rain, beads or even tiny figures, berries or Christmas tree decorations.

DIY topiary - photo
Topiary can be absolutely any - and this is their main charm. Don't limit your imagination and don't be afraid to experiment. And for inspiration, we offer you a large selection of ideas!


