
Handicraft is always appreciated for its uniqueness and originality. It is these homemade decorations that give the house a special atmosphere, create a feeling of warmth and comfort. At the same time, there can be a lot of options and interpretations: it is no longer necessary to limit oneself in materials and ideas. And we are already ready to share with you some interesting and step-by-step master classes!
1. Garland with balls of thread
Garlands with balls of thread took over interiors all over the world a few years ago. To make them, an ordinary transparent Christmas tree garland, balloons, PVA glue, needles and threads are enough. The main thing is to take cotton threads - they absorb glue better, which means they will keep their shape better.
Choose a thinner needle, thread a thread into it in the afternoon and pierce a jar of PVA through it so that the thread is saturated with glue. Inflate the balls to the desired size and start wrapping them with this thread. Do not overtighten so as not to deform or burst, but also do not loosen, otherwise the winding will not dry out.
Leave the blanks to dry completely: this is at least a few hours until they are completely hardened. Gently pop and take out the balls, find wide gaps between the threads in each ball and insert garland bulbs into them. Ready!


2. Staining with ice
This technology can be used to paint pillowcases, bedspreads, tablecloths and any other home textiles. Each drawing will be unique, because it is specifically impossible to repeat natural stains. You will need a cloth, a metal grate and a container to put it over, gloves and ice.
Wet the cloth and stretch it along the wire rack on the sink or over the basin. Crumple the canvas to make the drawings even more interesting and heterogeneous. Place ice cubes randomly on top and sprinkle everything with ordinary washing powder mixed with dye. Wait for the ice to melt, dip the fabric several times in cold water to set the color, dry it, and voila, you're done!


3. Patchwork technique
The bright and colorful patchwork technique is suitable for making decorative pillows, bedspreads, blankets, rugs, carpets, coasters and panels. It fits best with eclectic and ethnic styles, boho or provence.
Choose different pieces of fabric and cut them into equal sized squares. You can decorate them with other geometric elements or hearts. Connect triangles, rhombuses or trapezoids - the shapes are completely at your discretion.
Make a layout in advance to check how your patchwork canvas will look. This is especially important if you need precise dimensions: for example, for a decorative pillowcase. Sew the elements together gradually into a single canvas and do not forget to process the edges. If you want to make a product more durable for a carpet or bedspread - ours it on a solid base of a denser fabric.


4. Panel from dried flowers
You will need a canvas for work, paints, a stencil for painting and any dried flowers to your taste. First treat the stretched canvas with different acrylic paints. You can mix matte with glossy, ordinary with pearl - so you will also get a play of textures.
Place a stencil on the canvas and gently spray paint with a spray can or apply it with a dry brush. You do not need a dense coating, but rather an antiquity effect. It is more convenient to lay out a composition of flowers with tweezers, but the main thing is not to overdo it and not make it too bulky.
Glue all the parts with PVA glue, starting with the largest ones, and do not forget to press them with tweezers. After that, you can paint the flowers on top, make a light silver or golden dusting, just cover the panel with varnish.


10 ideas on how to make a bottle decoupage with your own hands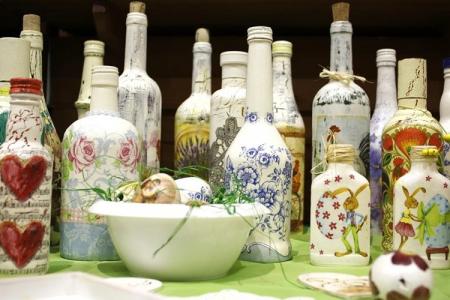
5. Wicker decorative pillowcase
Felt braids look warm, cozy and reminiscent of winter sweaters. Decorative pillowcases look especially elegant in this format in Scandinavian interiors. But according to the same principle, you can sheathe any other product.
For the pillowcase, cut out two main parts and many long strips, the total width of which is equal to the width of the base. Take the length of the strip with a margin, because it is from them that you will weave "braids". Stitch the strips from above to the top of the workpiece and start crossing them together.
If you like a looser pigtail, only stitch the edges to the base. If the denser version seems more practical to you, fasten each new turn with a line. Tuck the edges of the braid into the inner seam when you trim the pillowcase halves, or just tuck it up for flat details.


6. Planters using macrame technique
Hanging flowerpots made using macrame technique look light, airy and graceful. They don't have to be too complicated, and a minimalistic version can be done in literally 10 minutes. Start small and gradually master knitting more complex and specific knots.
For the simplest suspension, you will need a metal ring, 3 cords 2-3 meters long and a glass ball pot. Pull the ropes through the ring to the middle and secure so that you have six identical risers. Tie a tight and sturdy knot right next to the ring and hang it on a hook, or tie it to a doorknob to secure it while you work.
Separate the cords in pairs and tie a knot in each pair at a distance of 40-50 cm from the ring. After that, take adjacent ends from different pairs and repeat, only the distance will be less - 10-12 cm. Continue creating a zigzag pattern until you reach the end. And there, tie all six ends into one knot, pull it up and cut off the excess threads.


7. Carpet made of pom-poms
Voluminous fluffy carpets can make any room brighter and more comfortable. It is not at all necessary to spend money on them, because there are enough improvised materials: the remains of old woolen threads, scissors and a mesh base or an ordinary bath rug. You can even dissolve old unnecessary sweaters and scarves on such a rug.
To make pom-poms, use a cardboard blank in the form of a ring with a hole in the middle. Or an even simpler option - wrap the thread around your fingers, then carefully remove it and tie it in the middle. Cut off the ends with scissors and you have a finished pompom.
Make blanks until there are enough of them for sheathing the mesh base. After that, alternately tie them to it using the ends of the same thread with which you tie the balls in the middle. The denser and closer the pom-poms are, the fluffier the carpet will be.


Tracks on two needles without a seam: 6 master classes (video)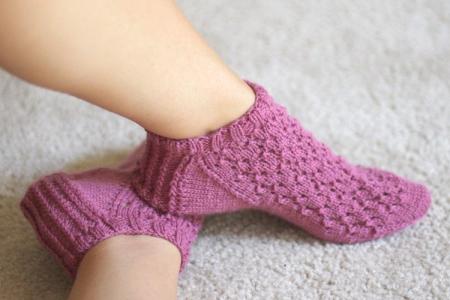
8. Candlestick from a wooden bar
If you have an unnecessary wooden block, using an ordinary drill and stain, you can make an unusual eco-friendly candlestick for Scandinavian interiors out of it. Cut a piece of the desired length, grind, mark the holes for small tea candles, think over the interval between them. You can simply place the candles along the bar as you like and mark their borders with a pencil.
For holes, use a Forstner drill - a special drill for blind and shallow round holes. To give the wood a more careless and aged look, do not remove irregularities by tapping on the ends with a hammer, leave slight abrasions. Cover the structure with stain and dry thoroughly - and your home candlestick is ready.


9. Carpet in the hallway from old clothes
Take unwanted T-shirts and any other scraps of fabric, scissors, needle thread, and duct tape. Cut strips of approximately the same width and thickness and lay them out on the table, alternating different colors. Secure the ends with tape so that they do not fidget or slip during work.
Start tying all the following with an extreme strip until you reach the middle and repeat all the same in a mirror image. When the outermost strips converge in the center, tie them together.Rainbow baubles are woven according to the same principle - perhaps you have already encountered them.
And repeat the process with the next strips until you reach the desired length of the rug. If the braided path turns out to be too narrow, make several of these and sew together.


10. Decoupage for decoration
Decoupage is a universal technique with which you can decorate everything: furniture, refrigerators, paintings, panels, jars, boxes and chests. You will need PVA glue, flat synthetic brushes, a sponge, acrylic primer and protective acrylic varnish. Any paper with the necessary drawings will do, but for the first time you can take special napkins for decoupage.
Degrease the base, especially if you are working with rounded glass jars. It is enough to wipe it with a napkin and sprinkle with alcohol for a much better grip. Apply a layer of primer with a wide brush and another layer with a soft sponge. If no special primer is available, regular acrylic paint will do.
Paint your base with a brush or sponge, depending on the desired density and effect. Strip the layered napkins and select only the top color layer. If you are using thick paper, first soak it a little in water.
Attach the drawing to the desired place and coat it with PVA glue or special decoupage glue. When everything is completely dry, cover the work with acrylic varnish on top, best of all - in several layers with preliminary drying of each.


How to dry oranges for decoration: 8 easy ways
11. Coasters for hot rope
If you have a thick, tight cord or rope, you can make stylish kitchen coasters out of it. And depending on the diameter of the cord - even a stand for furniture or a carpet for the hallway. To do this, you only need a clerical knife, a glue gun and a round fabric blank.
Find a perfectly flat work surface: table, windowsill, wood floor. Begin to twist the cord with a snake until you reach the diameter of your fabric blank. Cut off the excess and carefully glue the end so as not to move the resulting "snail".
Pass the glue around the entire perimeter and make several radial beams, then attach the fabric blank to the rope. The result is a fairly durable, non-slip and unpretentious stand or rug.


12. Pillows with buttons on chairs
To update an old chair, tie a homemade decorative pillow over it. You will need fabric for sewing, ribbons or braid for decoration and ties, filler and 4 buttons. You can stuff a pillow on a chair with a regular padding polyester, padding polyester or holofiber.
Measure the size of the seat and add a few centimeters to the seams, draw a pattern and mark the places for the buttons. In this case, they play not only a decorative role, but will also hold the evenly distributed filler. Therefore, sew them later to the finished product - through and through.
Round the corners, if necessary, and move on to the strings: cut out long stripes and sew them in half lengthwise. If you do not want to waste time on this, immediately take the finished braid and stitch it into the seam. When you sew the pillow, leave a small hole, turn it inside out, fill it and close it with a blind seam.


13. Decorative lampshade for a floor lamp
To make a classic lampshade, you will need a cardboard template and a piece of fabric of sufficient width. The frame can be cylindrical or conical - at your discretion and for your interior. Cut the fabric with a small margin of 1-2 cm to gently tuck and finish the edges.
If you have a patterned lampshade, gently apply the fabric to the workpiece so that all patterns match and look where you need to. Place fabric right side to template, pin back and mark seam allowances. Carefully remove the pins and wrap these allowances inward, and immediately reattach to keep the line straight.
Sew the fabric lampshade, finish the edges and iron the workpiece well. Apply glue to the surface and wait a little while it is soaked before pulling it over the frame.Make sure to cover the seam with the neatly processed side at the seam.
If you're attaching a lampshade to a wire frame, you don't necessarily need glue. It is enough to pull it up and tie it with thin cotton ribbons. In any other case, first dry the product completely, and only then put it on the lamp.


